The Ultimate Guide to Burn Amazon Music to CD
How do I burn a CD from Amazon Music? For Amazon Music users, you may want to find out the answer.
When it comes to Amazon Music, it is one of the most popular music streaming services nowadays. It offers more than 100 million songs and a deep podcast well at a reasonable price. Burning from Amazon Music to a CD is a convenient way to create a backup of storing your songs. It not only allows you to take your music anywhere but it also lets you easily share your favorite songs with your friends. If you still have a CD player, listening to Amazon music songs on it is gently nostalgic and terribly romantic!

In this post, we will introduce the ultimate guide to help you burn Amazon Music to CDs. Please read on the detailed steps below and learn how to achieve.
- 1. How to Burn Purchased Amazon Music to CDs
- 2. Download Songs from Amazon Music Unlimited to MP3
- 3. Burn Songs from Amazon Music to CD in Four Ways
Part 1. How to Burn a CD from Amazon Downloads
If you have an Amazon account, you can buy and download MP3 songs from the website Amazon.com, and then store them locally or to import them to another media player, like iTunes or Windows Media Player. In this way, you will be able to take the music you downloaded and burn it to a CD. It is actually quite easy.
Step 1. Navigate to Amazon Music in a web browser and log in to your Amazon account.
Step 2. Browse or search for a song or an album you want to download, you will see a selection of purchase options available. Buy the songs by clicking on the yellow button next to that song or album that shows the price on it.
Step 3. Go to "My Music". Select the albums or songs you want to download, and then click "Download".
Step 4. Import the download purchased MP3 songs to iTunes or Windows Media Player, and use either of the tools to burn the Amazon downloads to a CD. See the Part 3 for further details.
Part 2. How to Download Songs from Amazon Music Unlimited or Prime
Obviously, it's easy to burn the songs you purchased from Amazon website to CDs. However, if you have an Amazon Music subscription, you will find it is not simple to burn CDs from Amazon Music Unlimited or Prime. That's because Amazon Music Unlimited or Prime titles can only be accessed and played within the Amazon Music app or web player. In other words, they cannot be exported for use on other apps and devices, let alone copied onto CDs. But don’t worry, there is always a way out.
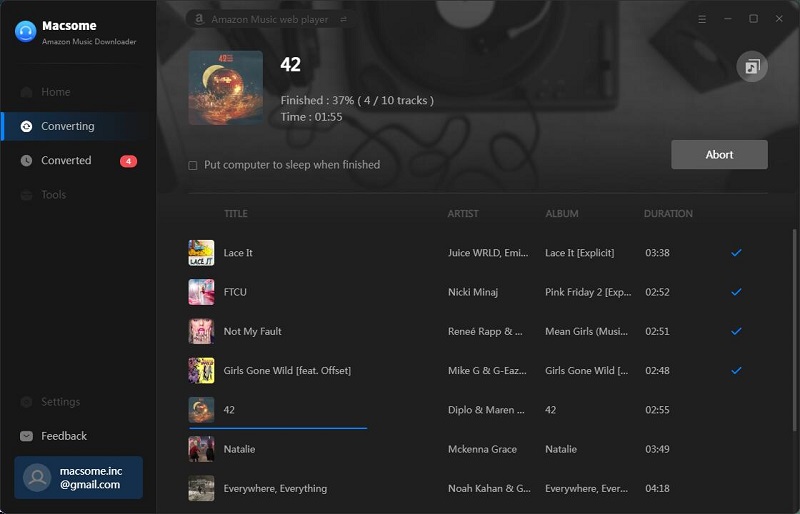
Macsome Amazon Music Downloader is such a smart tool for you. It is specially designed for Amazon Music subscribers, which enables you to download Amazon Music and podcasts to MP3 or other common audio formats with high output quality. Therefore, it is easy to burn Amazon Music Unlimited and Amazon Prime Music songs to a CD.
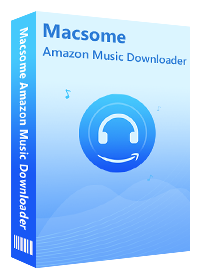
Features of Macsome Amazon Music Downloader
- Support downloading from Amazon Music Unlimited and Amazon Prime Music.
- Download Amazon Music and Podcast to MP3 / AAC / WAV / FLAC / AIFF / ALAC.
- Keep high output quality and all ID3 tags information after conversion.
- Support to download songs from Apple Music app and Amazon Music web player.
- Add downloaded Amazon Music to CD, SD card, iOS & Android devices, etc.
With the help of this Amazon Music Downloader, it is very easy to download Amazon Music songs to CDs. Please follow the steps below.
Step 1. Login Amazon Music Web Player
At first, download, install and run Macsome Amazon Music Downloader on your PC. If you choose to record songs from the Amazon Web Player, you don't have to install Amazon Music app separately. Just use your Amazon Music account to login Amazon Web Player by hitting "Sign in".

Step 2. Set Output Format for CDs
Click the icon in the lower left corner of the window, you can set MP3, WAV or AIFF as the best audio file formats for a CD player.
In addition, you also have the ability to select the Output Quality (256kbps, 192kbps, 128kbps), Output Folder and Output File Name. What's more, if you want to organize the downloaded Amazon music files, you can also set the Output Organized like Artist, Album, Artist/Album, or Album/Artist.

Step 3. Add Amazon Music to Macsome
Macsome supports downloading Amazon Music tracks, albums, playlists and podcasts. Simply select the created playlists, or browse through new content you'd like to download. Once you have decide to choose your favorite playlist or album, you will see the "Click to add" blue button. Click it, then all the selected songs from Amazon Music library will be imported to Macsome.

Step 4. Start Downloading Amazon Music Songs
Finally, press the "Convert" button to start the Amazon music downloading progress. Once the downloading is done, you can find the downloaded Amazon music files listed on the Converted tab.
Disclaimers
- This tool is only for personal or educational use.
- You should not use this tool to pirate or distribute music.
Part 3. Burn Songs from Amazon Music to CD in Four Ways
Now that all the downloaded Amazon Music files are ready on your PC. To burn songs from Amazon Music to a CD, we introduced the four different methods for you.
3.1 Burn Amazon Music Songs to a CD in iTunes
If you have installed iTunes on your computer, you can use iTunes to burn these music files to CD with the following steps:
Step 1. Import Music to iTunes
Open iTunes on your computer, go to the "File" menu, select "Add File To Library" or "Add Folder To Library" to browse the downloaded Amazon music songs and click "Open". Wait for iTunes to finish the importing process.
Step 2. Create a Playlist
To burn a CD in iTunes, you should create a playlist firstly. Simply click the "New" from the "File" menu, and click "Playlist" to create a new playlist. Then you can drag the added Amazon songs into to the new playlist.
Step 3. Start to burn a CD from Amazon Music
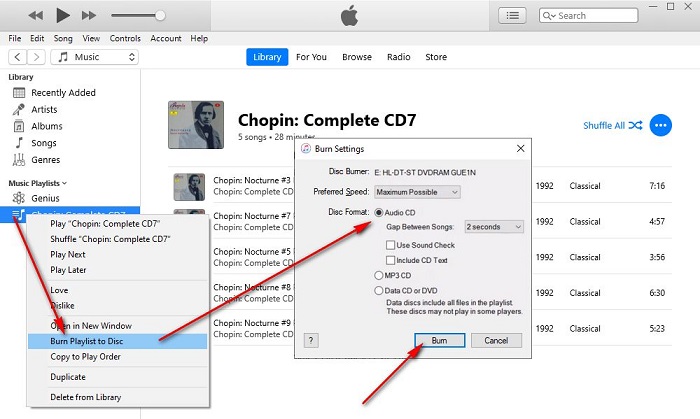
Before started, please select "View" - "Sort By" to sort the songs. After that, insert a blank CD into the disc drive of your computer, right-click on the playlist, select "Burn Playlist to Disc" option.
From the Burning Settings window, tick "Audio CD" and customize Preferred Speed, Gap Between Songs, Use Sound Check and Include CD Text as you need. Finally, click "Burn" button to strat burning Amazon songs onto a CD from iTunes. Eject the CD disk when the burning process is complete.
3.2 Burn Amazon Music to CD with Windows Media Player
This procedure explains how to use the Windows Media Player to burn the downloaded Amazon songs to a CD disc.
Step 1. Open the Windows Media Player, create a burn list. Browse to the downloaded songs from Amazon Music that you want to burn to the CD and then import the songs to the burn list.
Step 2. Insert a CD in the optical drive of your computer. From the pop-up AutoPlay window, choose the "Burn an audio CD using Windows Media Player".
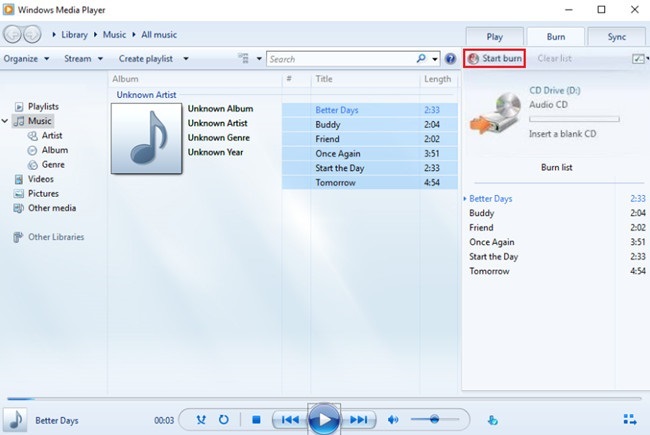
Step 3. Switch to media list and click "Burn" on the tab. Hit the "Burn options" and choose Audio CD.
Step 4. Drag items from your Windows Media Player Library to the right side of the window. Press the "Start Burn" button to activate the permanent copy of your Amazon songs onto the CD.
3.3 Burn CD from Amazon Music Songs with VLC Media Player
Another approach to burn CD is using VLC. Before starting, please make sure you have downloaded the latest version of VLC Media Player on your computer.
Step 1. Create a new playlist for Amazon Songs
Like iTunes, you must create a playlist made out of the files you want to burn. With VLC, you can simply drag and drop Amazon songs onto Playlist dock to do that.
Step 2. Configure the settings before burning
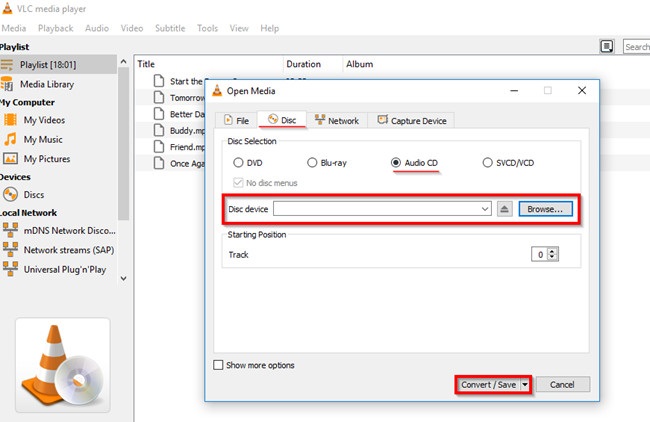
Click "Media" on the toolbar and choose "Convert/Save" from the drop-down menu. Insert the CD disc you want to rip to your computer's disk drive. On the pop-up Open Media window, select "Disc" tab, under which you will check "Audio CD" under "Disc Selection". For "Starting Position" by entering a number or hit the up arrow icon to set the track where you'd like to start. Click "Convert/Save" button to continue.
What goes next is the "Convert" window, select the "Tool" icon in "Settings", and then click the "Audio codec" tab, select the desired format, bit-rate, channels and sample rate you need. Click "Save" to apply the settings.
Step 3. Start the burning
Then you will go back to the "Convert" window, specify the destination folder by clicking on "Browse" button. Now click "Start" to begin the conversion process. Wait for a while, you can find your Audio CD has been burnt perfectly.
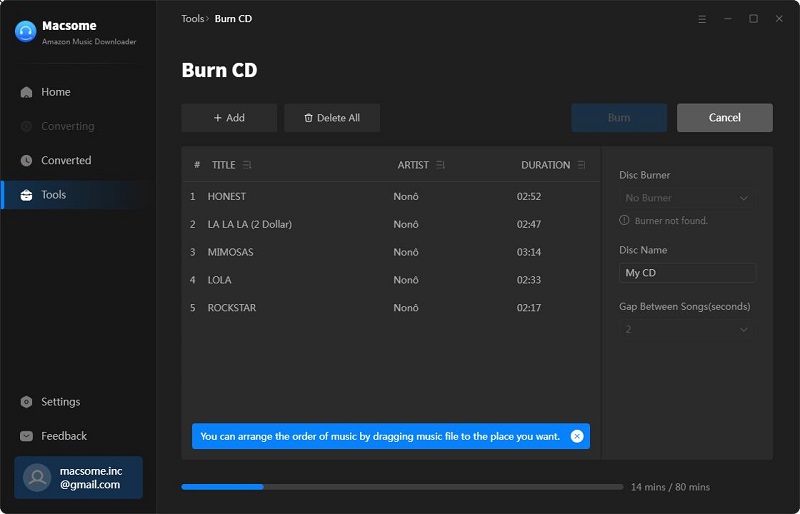
3.4 Burn Amazon Music to CD using Macsome Burn CD Tool
Macsome Amazon Music Downloader (Only for Windows users) offers a free tool that help you to burn the downloaded Amazon Music songs to CDs.
1. Turn to the "Tools" panel, then click the "Burn CD" option.
2. Click "Add" button to import the downloaded Amazon music files to Macsome.
3. Hit the "Burn" button to start burning the downloaded to the disc.
Conclusion
After reading the ultimate guide, no matter you purchased MP3 files from Amazon or subscribed Amazon Music, you would burn Amazon Music songs or podcasts to a CD successfully. Contrast the two ways, the price of purchasing the tracks is much higher than the fee to a monthly subscription.
Not only that, Macsome Amazon Music Downloader is suitable for both Amazon Music Unlimited and Prime Music subscribers, which also allows to download Amazon Music content to MP3 on your computer. Thus, you can still keep Amazon Music songs for playback even you cancel your subscription.
Macsome Amazon Music Downloader offers a free trial version, which allows you to convert 1 minute of each audio file. To unlock the limitations, please consider purchasing the full version.


 Russell Doe